No products in the basket.
How to Rebatch soap scraps and off cuts
Many people enjoy rebatching as it allows you to add fragrances or other ingredients and to make it into interesting shapes.
There are lots of resources from hobby websites which provide tips and suggestions on making your soap unique.
Rebatching cold process soap simply requires melting it and pouring it into suitable moulds and cutting it up after it has hardened.
There are many different ways to do this but this is how we do it ourselves using 1 kg of cold process soap.
(NOTE: these are guidelines only, you may wish to add more or less water or to add extra ingredients such as botanicals or fragrances or essential oils.
If you add more water your soap will take longer to dry out and if you add less the soap will be harder to melt. For anything else we recommend you visit specialist hobby sites.)
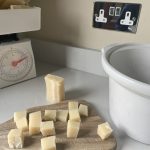
1. Cut up or grate soap scraps into small pieces so that they melt easily
2. Place them in either:
Crockpot/slow cooker
Microwaveable bowl
Glass bowl

3. Crockpot – Add approximately 180 ml spring water, heat on low, stirring occasionally; add more water if it is very thick. This can take several hours depending on how hard the original soap is. Do not be tempted to increase the temperature or the soap will burn.
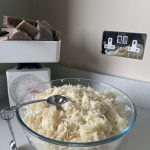
The soap is ready when it is a smooth paste like consistency. If you have cut it rather than grating it there will probably be small hard lumps left but you can use it at this point.

4. Microwaveable bowl. – Add approximately 180 ml of spring water, stir and place in microwave. Heat on full power. Our microwave is 900W and it takes about 12 minutes to melt the soap. Your microwave will take more or less time depending on its power rating. Remove the bowl carefully and stir occasionally. Once you are happy with a nice smooth consistency it is ready. There may be some small hard lumps left but we use it at this point.

5. Glass bowl – place the bowl over a saucepan of water and bring to the boil. We place a lid on the bowl. Do not let the water touch the bottom of the bowl.
DO NOT LET THE PAN BOIL DRY.
Stir the soap occasionally until it is smooth. This may take a couple of hours. Small hard lumps may remain but it is still fine to use it.

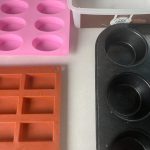
6. Moulding the soap
Once the soap is melted to your satisfaction pour or spoon it into your chosen mould.
Silicone moulds can be purchased (silicone cake moulds are excellent for this), plastic pots, or non stick cake tins. People even use lengths of drain pipe for circular bars.
Do NOT use aluminium tins as they will corrode.
If you let the soap cool you can roll it into balls and let it dry.
I use non stick bun tins as they make 12 nice size bars.
General points
a) The microwave is the most fuel-economical way to do this.
b) Completely smooth melted soap can be achieved by adding more water. However the soap will take longer to dry out and harden before you can use it.
c) Less water means you get harder soap, sooner but the soap may not stick together and you may need to redo the rebatch procedure.
These are all matters of personal choice. If you enjoy DIY, rebatching soap can be a very enjoyable way of customising readymade soap. You can make it with milk, add honey, devise your own fragrances or make gifts or wedding favours.
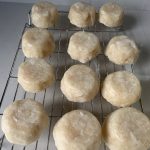
Let your soap dry and remove it from the mould after 24 hours. If it is hard to get it out you may consider freezing it and tapping it on the worktop afterwards to loosen it.
I often loosen it with a knife and lever it out if I am in a hurry.
It gives a nice smooth feel if you rub the bars with damp hands after unmolding but this is not essential.
Letting it dry and harden means your soap will last longer. Always keep soap in a dry place and when in use store it on a draining soap dish, ideally on a window sill for longest life.
Good luck and have fun with your new soap!